
Using Your Snow Wolf
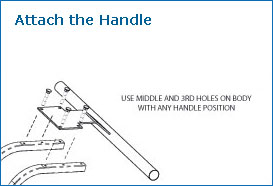
ASSEMBLY - SETTING HANDLE POSITION
To set up your Snow Wolf wheeled snow shovel in the most comfortable and effective position for better snow shoveling, you can attach the handle in any one of a number of handle heights and lengths. You can adjust the height and length of the handle to fit the way you shovel in different snow conditions. The handle can be attached to the Snow Wolf frame/body in different ways to change the handle height and Snow Wolf length. You can adjust the handle up or down within a 6-1/2 inch range.
We recommend that the height of the handle on your Snow Wolf wheeled snow shovels be placed between your waist and chest, generally as high as you can comfortably still push snow with the Snow Wolf. Position the handle so that your hands rest comfortably on top..but closer to chest level if you can still clear snow comfortably.
To increase the height of the Snow Wolf handle, detach the hinge link wire lock pin (silver) by slipping the wire off the pin and then removing the pin. Then adjust the upper frame height to the desired height and reinsert the pin into which holes match most closely the height you like (3 sets of holes make 4 handle height settings), then flip over and clip on the wire lock to prevent the pin from coming out.
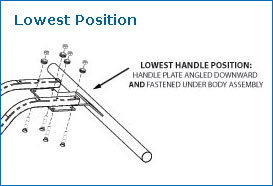
LOWEST POSITION
If you are under 5-feet-6-inches tall, one of the two lower handle settings should work best. Also the handles have two sets of holes they can be attached on and the shorter setting there might also be suitable for under 5’ 6”.
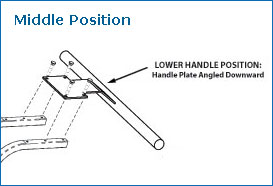
MIDDLE POSITION
You may consider fastening Snow Wolf wheeled snow shovels handles to the uppermost surface of the assembly for greater height.

HIGHEST POSITION
If you are taller you might prefer the longer handle bar attachment holes and the hinge link in one of the two higher handle settings (so longer and taller setup).

SHORTEN LENGTH
As mentioned, you can extend or shorten the body length, but still preferably keep the handles a bit above your waist.

ADJUST THE WHEEL AND AXLE
What you will learn is that there are many ways to set up the Snow Wolf. shovel to fit you. Try a few different wheel attachment settings to find out what works best for you in varying snow conditions. In this way, you can find the most efficient balance between power and throwing distance.
ASSEMBLY - ATTACHING THE BLADE
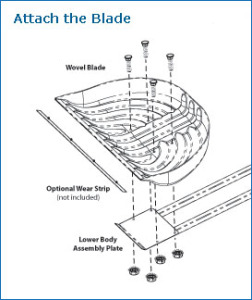
Step 1
Attach the Snow Wolf blade using four carriage bolts and keps nuts.
Step 2
Insert the carriage bolts through the square holes on the blade side then through the frame.
Step 3
Attach the keps nuts to the carriage bolts on the underside of the lower body J frame.
Step 4
Hand-tighten the nuts and then use a 7/16 (11mm) wrench, socket wrench, or pliers to securely fasten the bolts.
ASSEMBLY - BODY & AXLE PLATES
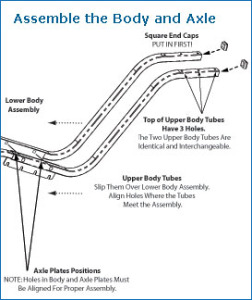
Step 1
To begin, insert the square end caps into the openings at the top of the upper body frame. Gently tap the end cap against a hard surface to secure them.
Step 2
Attach the upper frame to one of the hinge links and the other hinge link to the lower, J Frame.
Step 3
Lay both frames on the ground lined up (with the frames straight and with the hinge links overlapping so the larger holes all line up) and then insert the axle tube through the ¾” (19mm) holes and temporarily clip on the axles hair pin/clip at the end of the axle tube.
Step 4
Next fold the frame on the hinge links/axle and insert the silver wire lock pin and secure it in any one of the sets of three handle height holes (the small set of holes configured roughly in a triangular pattern).
Step 5
Now take the clip off the end of the axle tube and insert the axle tube end fully into the wheel hub so the axle tube end comes out the far side of the wheel. Make sure the wheel is on the correct side of the frame. If not, just remove the axle tube and insert it from the other side and then install the wheel. Lastly, re-clip the hairpin clip on the end of axle tube to secure the wheel. If you ever lose the hairpin clip a heavy piece of wire will do.
Step 6
Now you can adjust the handle height as you prefer by removing the wirelock pin from the hinge links and reinserting in a different set of holes after finding the best handle height you like.
ASSEMBLY - OTHER

STORAGE
There are several ways to store your Snow Wolf wheel shovels when not in use.
If you are just taking a break from using the Snow Wolf wheeled snow shovels or temporarily storing your unit, there are two ways to store your Snow Wolf wheeled snow shovel:
1. The easiest way to store the Snow Wolf wheeled snow shovel is to leave the wheel on and stand the Snow Wolf on the Snow Wolf Blade edge and lean the Snow Wolf wheeled snow shovel against a wall.
2. Alternately, you can place the blade on the ground, like you are going to start to use Snow Wolf wheeled snow shovels, and push the blade into and under a snow pile. The weight of the snow will keep Snow Wolf wheeled snow shovels in the upright position. Or you can take the wheel off and hang your Snow Wolf on the wall like a shovel or stand it(with the handles on the ground NOT the blade – for short periods it is OK but you can bend the blade by storing it on the blade for long periods – see our Video Guide on how to fix that if you have done that). Or now with the folding frame Snow Wolf, you can take the wheel off, and fold the frame and store it on a shelf – in less space than even a standard snow shovel!
For off-season storage, you can break the Snow Wolf wheeled snow shovel down and even detach the upper and lower frames if it helps.
MAINTENANCE
The blade is designed to flex, both to lessen the impact of hitting hidden objects like curbs, and to reduce wear as it scrapes the ground. But the shovel blade will eventually wear out over time, although you should be able to count on your blade lasting several seasons, at least.